|
-
May 04, 2024, 10:08:40 am

- Welcome, Guest
News:Official site launch very soon, hurrah!
|
11
on: January 19, 2020, 01:11:48 am
|
|
Started by Dakusan - Last post by Dakusan
|
I’ve always thought that the RSA and Diffie–Hellman public key encryption algorithm systems are beautiful in their complex simplicity. While there are countless articles out there explaining how to implement them, I have never really found one that I think describes the math behind then in a simple way, so I thought I’d give a crack at it. Both algorithms are derived from 3 math axioms: - This is called Modular exponentiation (hereby referred to as modexp). In the following, x is a prime numbers and p is an integer less than x.
p^(x ) mod x = p (e.x. 12^(17 ) mod 17 = 12) p^(x-1) mod x = 1 (e.x. 12^(17-1) mod 17 = 1 )
- A further derivation from the above formulas shows that we can combine primes and they work in the same manner. In the following, x and y are prime numbers and p is an integer less than x*y.
p^((x-1)*(y-1) ) mod (x*y) = 1 (e.x. 12^((13-1)*(17-1) ) mod (13*17) = 1 ) Note: This formula is not used in RSA but it helps demonstrate how the formulas from part 1 becomes formula 2b.
Due to how modexp works with primes, values of p that are multiples of x or y do not work with 2a. p^((x-1)*(y-1)+1) mod (x*y) = p (e.x. 12^((13-1)*(17-1)+1) mod (13*17) = 12)
- The final axiom is how modexp can be split apart the same way as in algebra where (x^a)^b === x^(a*b). For any integers p, x, y, and m:
(p^(x*y) mod m) === ((p^x mod m)^y mod m)
With these 3 axioms we have everything we need to explain how RSA works. To execute an RSA exchange, encrypted from Bob and decrypted by Alice, the following things are needed.
| The variable | Variable name | Who has it | Who uses it | Description |
|---|
| Prime Numbers 1 and 2 | Prime1, Prime2 | Alice | Alice | Alice will use these to derive variables PubKey, PrivKey, and Modulo. In our examples we use small numbers, but in reality, very large primes will be used, generally of at least 256 bit size. | | Public key | PubKey | Alice, Bob | Bob | Alice sends this to Bob so he can encrypt data to her. Bob uses it as an exponent in a modexp. | | Private key | PrivKey | Alice | Alice | Alice uses this to decrypt what Bob sends her. Alice uses it as an exponent in a modexp. | | Modulo | Modulo | Bob, Alice | Bob, Alice | Alice sends this to Bob. They both use it as a modulo in a modexp | | Payload Data | Payload | The data bob starts with and turns into EncryptedPayload. Alice derives Payload back from EncryptedPayload |
Now, let’s start with axiom 2b: Payload^((Prime1-1)*(Prime2-1)+1) mod (Prime1*Prime2) = Payload Let’s change this up so the exponent is just 2 multiplications so we can use axiom 3 on it. We need to find 2 integers to become PubKey and PrivKey such that: PubKey*PrivKey=(Prime1-1)*(Prime2-1)+1 And Modulo is Prime1*Prime2. So we now have: Payload^(PubKey*PrivKey) mod Modulo = Payload Now, using axiom 3, we can turn it into this: (Payload^PubKey mod Modulo)^PrivKey mod Modulo = Payload Now, we can split this up into:Bob calculates and sends to Alice: Payload^PubKey mod Modulo=EncryptedPayloadAlice uses the received EncryptedPayload and performs: EncryptedPayload^PrivKey mod Modulo = PayloadAnd the process is complete! However, there is 1 caveat that I didn’t cover which makes the encryption that what we currently have weak. The calculation of PubKey and PrivKey from Prime1 and Prime2 needs to follow some rather specific complex rules to make the keys strong. Without this, an attacker may be able to figure out Prime1 and Prime2 from the Modulo and PubKey, and could then easily derive PrivKey from it. I generally see the PubKey as 65535, or another power of 2 minus 1. |
|
12
on: January 10, 2020, 05:23:33 pm
|
|
Started by Dakusan - Last post by Dakusan
|
Tmux is a great alternative to gnu screen. I can’t believe I’ve never posted my custom Tmux config for Cygwin after all the work I put into it years ago. So here it is. Its features include: - Uses ctrl+a, like gnu screen, instead of ctrl+b
- Mouse interaction is enabled
- Tab bar/windows:
- Current tab is highlighted in cyan
- Cycle through tabbed windows with a click on its tab or ctrl+arrowkeys
- Reorder tabbed windows with a drag of its tab or alt+arrowkeys
- ctrl+a,/ to rename a tab on the tab bar
- Create new window with ctrl+a,c
- Panes
- Create split panes with vertical=ctrl+a,| and horizontal=ctrl+a,-
- Move around panes with click or ctrl+shift+arrowkeys
- Resize panes by dragging on the separator bar or use ctrl+shift+alt+arrowkeys
- Panes automatically resize to fit OS window
- Clipboard/highlighting
- Copy text to clipboard by highlighting it. Had to use a minor hack to fix a cygwin selection problem
- Paste from clipboard with right click
- Middle mouse button+drag starts copy mode
- When in copy mode, u runs the selection as a command in a separate window (Instead of “cygstart” for cygwin, use “xdg-open” for linux, or “open” for MacOS X)
- Double click selects word
- Double middle click runs the word under the mouse as a command
- Start the session on the current bash directory
- Escape time is lowered for quicker response to scroll buffer access (ctrl+a,pageup)
To use this, save the file to ~/.tmux.conf
#Set current directory setting for cygwin
set-environment -g CHERE_INVOKING 1

#Mouse interaction
set -g mouse on

#Lower escape timing from 500ms to 50ms for quicker response to scroll-buffer access
set -s escape-time 50

#Window always takes up largest possible max size
set-window-option -g aggressive-resize

#Highlight active window in tab-bar at bottom in cyan
set-window-option -g window-status-current-bg cyan

#Reorder windows in status bar by drag & drop
bind-key -n MouseDrag1Status swap-window -t=

#Copy to clipboard on text selection in cygwin. Move cursor position 1 to the right before copy to bypass a bug
bind -Tcopy-mode MouseDragEnd1Pane send-keys -X cursor-right\; send -X copy-selection-and-cancel\; run-shell -b "tmux show-buffer > /dev/clipboard"

#Paste from clipboard with right click in cygwin
bind-key -n MouseDown3Pane run-shell 'tmux set-buffer -b winclip "$(cat /dev/clipboard)"'\; paste-buffer -db winclip

#Middle drag starts copy mode
bind -n MouseDrag2Pane copy-mode -M

#When in copy mode, "u" runs the selection as a command in a separate window (Instead of "cygstart" for cygwin, use "xdg-open" for linux, or "open" for MacOS X)
bind -Tcopy-mode u send -X copy-selection-and-cancel\; run-shell -b "tmux show-buffer | xargs cygstart"

#Double click selects word
bind-key -n DoubleClick1Pane copy-mode -M\; send-keys -X select-word

#Double middle click runs the word under the mouse as a command. See description for MouseDown3Pane above
bind-key -n DoubleClick2Pane copy-mode -M\; send-keys -X select-word\; send -X copy-selection-and-cancel\; run-shell -b "tmux show-buffer | xargs cygstart"

#Remap prefix to Control+a
set -g prefix C-a
unbind C-b
#bind 'C-a C-a' to type 'C-a'
bind C-a send-prefix

#Start in CWD when creating or splitting tabs; move the splitting planes keys to | and -
bind '|' split-window -h -c '#{pane_current_path}'  # Split panes horizontal
bind '-' split-window -v -c '#{pane_current_path}'  # Split panes vertically
bind c new-window -c '#{pane_current_path}' # Create new window
unbind '"'
unbind %

#prefix, / -- Renames window, but starts blank
bind-key / command-prompt "rename-window '%%'"

#Select next/prev window with Ctrl+(Left|Right)
bind-key -n C-Right next-window
bind-key -n C-Left previous-window

#Reorder window with Alt+(Left|Right)
bind-key -n M-Left swap-window -t -1
bind-key -n M-Right swap-window -t +1

#Switch panes using Ctrl+Shift+arrow
bind -n C-S-Left select-pane -L
bind -n C-S-Right select-pane -R
bind -n C-S-Up select-pane -U
bind -n C-S-Down select-pane -D

#Resize panes using Ctrl+Shift+Alt+arrow
bind-key -n C-S-M-Up resize-pane -U 1
bind-key -n C-S-M-Down resize-pane -D 1
bind-key -n C-S-M-Left resize-pane -L 1
bind-key -n C-S-M-Right resize-pane -R 1
|
|
13
on: September 24, 2019, 04:59:08 pm
|
|
Started by Dakusan - Last post by Dakusan
|
I recently decided to swap around my hard drives to different SATA slots so my most used hard drives were on the fastest ports. Unfortunately, when I did this, my computer stopped booting to Windows. I never did figure out why my bootable EFI partitions only showed up randomly in BIOS depending on which hard drives were plugged in, but I found a configuration the computer liked and I was able to see the Microsoft Boot EFI partition and EFI boots on my USB keys. The next step was to get the computer actually booting to something I could run commands on. When I try to boot directly to the EFI shell, the resolution is always screwed up and I can only see the top half of what should be visible, so I can’t actually see the command line I am typing too. This actually happens to everything I directly boot to that uses console text. The way around this for me is that I need to boot to the BIOS setup, and from there tell it to boot immediately to the EFI option of my choice when exiting the BIOS. From there, the proper resolution is used and everything is visible. Next, in the EFI shell, you can run map to see all of the available possible mounts. This should automatically run when the EFI shell starts anyways, so you should already have that information. Any detected EFI partition on any bootable device should be given a mapping of “fs#” where # is a number. In my case, it was fs0. So to mount that, I ran mount fs0 x. “x” could be whatever you want, it doesn’t really matter. It’s analogous to a drive letter in windows, and you can make it any string (within reason, I believe anything alphanumeric should be fine). So next you would run x: to switch to that drive. From there, you can run cd EFI\Microsoft\Boot and then bootmgfw.efi to boot to windows. Since I use VeraCrypt system encryption, I had to go to “EFI\VeraCrypt” and run DcsBoot.efi to finally boot into Windows through VeraCrypt. Finally, to get the Windows Boot manager to start with VeraCrypt, run in the Windows command prompt bcdedit /set '{bootmgr}' path \EFI\VeraCrypt\DcsBoot.efi. |
|
14
on: August 10, 2019, 10:48:07 pm
|
|
Started by Dakusan - Last post by Dakusan
|
I recently tried to install Slackware 4.2 64-bit (Linux) onto a new mini PC I just bought. The new PC only supports UEFI so I had major issues getting the darn setup on the install cd to actually run. I never DID actually get the install cd to boot properly on the system, so I used an alternative. While the slack install usb key was in, I also added and loaded up an ubuntu live cd usb key. The following is what I used to run the slackware setup in Ubuntu.
#Login as root
#sudo su

#Settings
InstallDVDName=SlackDVD #This is whatever you named your slackware usb key

#/mnt will contain the new file system for running the setup
cd /mnt

#Extract the initrd.img from the slackware dvd into /mnt
cat /media/ubuntu/$InstallDVDName/isolinux/initrd.img | gzip -d | cpio -i

#Bind special linux directories into the /mnt folder
for i in proc sys dev tmp; do mount -o bind /$i ./$i; done

#Mount the cdrom folder into /mnt/cdrom
rm cdrom
mount -o bind /media/ubuntu/$InstallDVDName/ ./cdrom

#Set /mnt as our actaul (ch)root
chroot .

#Run the slackware setup
usr/lib/setup/setup

#NOTE: When installing, your package source directory is at /cdrom/slackware64
|
|
15
on: June 26, 2019, 09:53:33 pm
|
|
Started by Dakusan - Last post by Dakusan
|
It’s a bit of a pain reading results from batch requests to Mailchimp. Here is a quick and dirty bash script to get and pretty print the JSON output. It could be cleaned up a little, including combining some of the commands, but meh.
#Example variables
BATCHID=abc1234567;
APIKEY=abcdefg-us11@us11.api.mailchimp.com;
APIURL=us11.api.mailchimp.com;

#Request the batch information from Mailchimp
curl --request GET --url "https://dummy:$APIKEY@$APIURL/3.0/batches/$BATCHID" 2> /dev/null | \

#Get the URL to the response
grep -oP '"response_body_url":"https:.*?"' | \
grep -oP 'https:[^"]*' | \

#Get the response
xargs wget -O - 2> /dev/null | \

#The response is a .tar.gz file with a single file in it. So get the contents of this file
tar -xzvO 2> /dev/null | \

#Pretty print the json of the full return and the “response” objects within
php -r '$Response=json_decode(file_get_contents("php://stdin"), true); foreach($Response as &$R) $R["response"]=json_decode($R["response"], true); print json_encode($Response, JSON_PRETTY_PRINT);'
|
|
16
on: April 08, 2019, 09:31:09 pm
|
|
Started by Dakusan - Last post by Dakusan
|
Part of my workstation’s audio setup uses the RME Babyface Pro. Until the most recent update of their software, the built-in Window’s sound’s master volume for the device was ignored. So while this script isn’t as important as before, I still find it very useful. So the following is an AutoHotkey script which modifies the master volume in the TotalMix FX window via the mousewheel (when alt+ctrl is held down). This expects the TotalMix FX window to be sized as small as it can, and to have a channel selected for the control room’s Main Out. It should look like this: 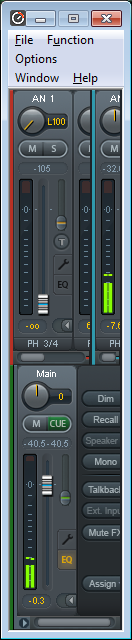 The script is as follows:
;Function to create lparam/wparam for SendMessage
CalculatePARAM(w1, w2)
{
   IfLess, w1, 0
      w1 := 65535 + w1 + 1
   IfLess, w2, 0
      w2 := 65535 + w2 + 1

   return (w2<<16 | w1)
}

;Send a mouse wheel action to a window
SendMouseWheel(WindowHWND, Steps, XPos, YPos)
{
   ;Constants
   WM_MOUSEWHEEL := 0x20A
   WheelStepAmount := 120

   ;Calculate and execute the message
   WinGetPos, ScreenX, ScreenY,,, ahk_id %WindowHWND%
   wparam := CalculatePARAM(0, Steps*WheelStepAmount)
   lparam := CalculatePARAM(XPos+ScreenX, YPos+ScreenY)
   SendMessage, %WM_MOUSEWHEEL%, %wparam%, %lparam%,, ahk_id %WindowHWND%
}

^!WheelUp::
ControlGet, ControlHWND, Hwnd,,AfxFrameOrView100s1,RME TotalMix
if ControlHWND
   SendMouseWheel(ControlHWND, 1, 36, 428)
return

^!WheelDown::
ControlGet, ControlHWND, Hwnd,,AfxFrameOrView100s1,RME TotalMix
if ControlHWND
   SendMouseWheel(ControlHWND, -1, 36, 428)
return
|
|
17
on: January 30, 2019, 12:52:47 am
|
|
Started by Dakusan - Last post by clowg
|
|
PS: There is a new API available for Playlist importing:https://forums.plex.tv/t/can-plexamp-read-and-use-m3u-playlists/234179/32
G.
|
|
18
on: January 30, 2019, 12:38:42 am
|
|
Started by Dakusan - Last post by clowg
|
|
Hi @Dakusan
I have come back to your script/.exe because Plex threw away one of my previously imported m3u Playlists.Im getting this error:
PlexPlaylistImporter.exe -p "D:\PlexServer\Plex Media Server\Plug-in Support\Databases\com.plexapp.plugins.library.db" "D:\7mc\plexplaylistimporter\top 550 songs.m3u" Top550SongsPlex playlist is not already created. Would you like to create it now (y/n)? y
DB Error: no such collation sequence: naturalsort
This is on Windows 10 x64, on the Plex Server console. The exe worked really hard for about 10 minutes before coming up with the playlist creation question, and then immediately failed with the error.Any ideas on that one?
G.
|
|
19
on: December 29, 2018, 04:48:03 am
|
|
Started by Dakusan - Last post by Dakusan
|
#This script takes a newline delimited file list from STDIN for md5 hashing
#This script requires the `md5sum`, `pv`, `paste`, `bc`, and 'numfmt' commands

#The output of the md5s are stored in the file specified by the first parameter
#The format for each md5 hash to the output file is "$FileName\t$Hash\n"

#File sizes are always output in megabytes with 3 decimal places
#While calculating the hashes the script keeps the user informed of the progress of both the current file and all the files as follows:
#1) "Hashing: $FileName ($FileSize MiB)\n"
#2) The progress of the hash of the file ran through `pv`, with the size precalculated for file progress percents
#3) "Finished $TotalProgressPercent% ($ProcessedBytes/$TotalBytes MiB)\n\n"

#Get $Outfile from the first argument and the $FileList from STDIN (newline delimited)
OutFile="$1";
FileList=`cat /dev/stdin`

#Format a byte count in MegaBytes with comma grouping and 3 decimal places
MbFmtNoExt ()
{
   echo "scale=3; $1/1024/1024" | bc | echo -n `xargs numfmt --grouping`
}

#Add " MiB" to the end of MbFmtNoExt
MbFmt ()
{
   echo `MbFmtNoExt $1`" MiB"
}

#Calculate and output the total size of the file list
echo -n "Calculating total size: "
TotalSize=`echo "$FileList" | xargs -d"\n" stat --printf="%s\n" | paste -s -d+ | bc`
MbFmt $TotalSize
echo #Add an extra newline

#Run over the list (newline delimited)
CalculatedBytes=0
IFS=$'\n'
for FileName in `echo "$FileList"`
do
   #Output the file size and name to STDOUT
   FileSize=`stat --printf="%s" "$FileName"`
   echo "Hashing: $FileName ("`MbFmt $FileSize`")"

   #Output the filename to $OutFile
   echo -n $FileName$'\t' >> $OutFile

   #Run the md5 calculation with `pv` progress
   #Output the hash to $OutFile after the FileName and a tab
   cat "$FileName" | pv -s $FileSize | md5sum | awk '{print $1}' >> $OutFile

   #Output the current progress for the entire file list
   #Format: "Finished $TotalProgressPercent% ($ProcessedBytes/$TotalBytes MiB)\n\n"
   CalculatedBytes=$(($CalculatedBytes+$FileSize))
   echo -n "Finished "
   printf "%.3f" `echo "scale=4; $CalculatedBytes*100/$TotalSize" | bc`
   echo "% ("`MbFmtNoExt $CalculatedBytes`"/"`MbFmt $TotalSize`$')\n'
done
|
|
20
on: December 07, 2018, 03:29:27 pm
|
|
Started by Dakusan - Last post by Dakusan
|
On my primary computer (whose harddrive is encrypted) I always have Windows auto logging in to help with the bootup time. However, my bootup time can be rather slow; and if I needed to have my computer booted but locked, I had to wait for the login to complete so I could lock the computer. This has been becoming a nuisance lately when I need to get out of my house quickly in the morning. For the solution I created a windows boot entry that auto locks the computer after logging the user in. This also requires a batch file, to run for the user on startup, to detect when this boot entry was selected. Here are the steps to create this setup: - Create the new boot entry:In the windows command line, run: bcdedit /copy {current} /d "Lock on Startup"
This creates a new boot option, duplicated from your currently selected boot option, in the boot menu labeled “Lock on Startup”. - (Optional) Change the bootup timeout:In the windows command line, run: bcdedit /timeout 5
Where 5 is a 5 second timeout. - Create a batch file to run on login:In your start menu’s startup folder, add a batch file. You can name it anything as long as the extension is “.bat”.
Add the following to the file: bcdedit /enum {current} | findstr /r /c:"description *Lock on Startup" && rundll32.exe user32.dll,LockWorkStation
Note that there are 2 spaces in the description search string to replicate the regular expression's 1 or more quantifier “+”, since findstr only supports the 0 or more quantifier “*”.
|
|
|