|
-
May 03, 2024, 12:54:36 pm

- Welcome, Guest
News:Official site launch very soon, hurrah!
Show Posts
This section allows you to view all posts made by this member. Note that you can only see posts made in areas you currently have access to.
Messages - Dakusan
16
« on: April 08, 2019, 09:31:09 pm »
Part of my workstation’s audio setup uses the RME Babyface Pro. Until the most recent update of their software, the built-in Window’s sound’s master volume for the device was ignored. So while this script isn’t as important as before, I still find it very useful. So the following is an AutoHotkey script which modifies the master volume in the TotalMix FX window via the mousewheel (when alt+ctrl is held down). This expects the TotalMix FX window to be sized as small as it can, and to have a channel selected for the control room’s Main Out. It should look like this: 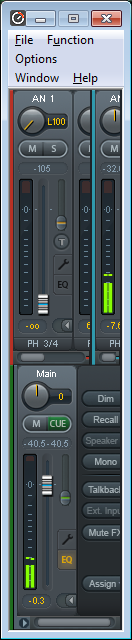 The script is as follows:
;Function to create lparam/wparam for SendMessage
CalculatePARAM(w1, w2)
{
   IfLess, w1, 0
      w1 := 65535 + w1 + 1
   IfLess, w2, 0
      w2 := 65535 + w2 + 1

   return (w2<<16 | w1)
}

;Send a mouse wheel action to a window
SendMouseWheel(WindowHWND, Steps, XPos, YPos)
{
   ;Constants
   WM_MOUSEWHEEL := 0x20A
   WheelStepAmount := 120

   ;Calculate and execute the message
   WinGetPos, ScreenX, ScreenY,,, ahk_id %WindowHWND%
   wparam := CalculatePARAM(0, Steps*WheelStepAmount)
   lparam := CalculatePARAM(XPos+ScreenX, YPos+ScreenY)
   SendMessage, %WM_MOUSEWHEEL%, %wparam%, %lparam%,, ahk_id %WindowHWND%
}

^!WheelUp::
ControlGet, ControlHWND, Hwnd,,AfxFrameOrView100s1,RME TotalMix
if ControlHWND
   SendMouseWheel(ControlHWND, 1, 36, 428)
return

^!WheelDown::
ControlGet, ControlHWND, Hwnd,,AfxFrameOrView100s1,RME TotalMix
if ControlHWND
   SendMouseWheel(ControlHWND, -1, 36, 428)
return
17
« on: December 29, 2018, 04:48:03 am »
#This script takes a newline delimited file list from STDIN for md5 hashing
#This script requires the `md5sum`, `pv`, `paste`, `bc`, and 'numfmt' commands

#The output of the md5s are stored in the file specified by the first parameter
#The format for each md5 hash to the output file is "$FileName\t$Hash\n"

#File sizes are always output in megabytes with 3 decimal places
#While calculating the hashes the script keeps the user informed of the progress of both the current file and all the files as follows:
#1) "Hashing: $FileName ($FileSize MiB)\n"
#2) The progress of the hash of the file ran through `pv`, with the size precalculated for file progress percents
#3) "Finished $TotalProgressPercent% ($ProcessedBytes/$TotalBytes MiB)\n\n"

#Get $Outfile from the first argument and the $FileList from STDIN (newline delimited)
OutFile="$1";
FileList=`cat /dev/stdin`

#Format a byte count in MegaBytes with comma grouping and 3 decimal places
MbFmtNoExt ()
{
   echo "scale=3; $1/1024/1024" | bc | echo -n `xargs numfmt --grouping`
}

#Add " MiB" to the end of MbFmtNoExt
MbFmt ()
{
   echo `MbFmtNoExt $1`" MiB"
}

#Calculate and output the total size of the file list
echo -n "Calculating total size: "
TotalSize=`echo "$FileList" | xargs -d"\n" stat --printf="%s\n" | paste -s -d+ | bc`
MbFmt $TotalSize
echo #Add an extra newline

#Run over the list (newline delimited)
CalculatedBytes=0
IFS=$'\n'
for FileName in `echo "$FileList"`
do
   #Output the file size and name to STDOUT
   FileSize=`stat --printf="%s" "$FileName"`
   echo "Hashing: $FileName ("`MbFmt $FileSize`")"

   #Output the filename to $OutFile
   echo -n $FileName$'\t' >> $OutFile

   #Run the md5 calculation with `pv` progress
   #Output the hash to $OutFile after the FileName and a tab
   cat "$FileName" | pv -s $FileSize | md5sum | awk '{print $1}' >> $OutFile

   #Output the current progress for the entire file list
   #Format: "Finished $TotalProgressPercent% ($ProcessedBytes/$TotalBytes MiB)\n\n"
   CalculatedBytes=$(($CalculatedBytes+$FileSize))
   echo -n "Finished "
   printf "%.3f" `echo "scale=4; $CalculatedBytes*100/$TotalSize" | bc`
   echo "% ("`MbFmtNoExt $CalculatedBytes`"/"`MbFmt $TotalSize`$')\n'
done
18
« on: December 07, 2018, 03:29:27 pm »
On my primary computer (whose harddrive is encrypted) I always have Windows auto logging in to help with the bootup time. However, my bootup time can be rather slow; and if I needed to have my computer booted but locked, I had to wait for the login to complete so I could lock the computer. This has been becoming a nuisance lately when I need to get out of my house quickly in the morning. For the solution I created a windows boot entry that auto locks the computer after logging the user in. This also requires a batch file, to run for the user on startup, to detect when this boot entry was selected. Here are the steps to create this setup: - Create the new boot entry:In the windows command line, run: bcdedit /copy {current} /d "Lock on Startup"
This creates a new boot option, duplicated from your currently selected boot option, in the boot menu labeled “Lock on Startup”. - (Optional) Change the bootup timeout:In the windows command line, run: bcdedit /timeout 5
Where 5 is a 5 second timeout. - Create a batch file to run on login:In your start menu’s startup folder, add a batch file. You can name it anything as long as the extension is “.bat”.
Add the following to the file: bcdedit /enum {current} | findstr /r /c:"description *Lock on Startup" && rundll32.exe user32.dll,LockWorkStation
Note that there are 2 spaces in the description search string to replicate the regular expression's 1 or more quantifier “+”, since findstr only supports the 0 or more quantifier “*”.
19
« on: October 11, 2018, 09:27:26 pm »
It is not possible with the program, and would not be easy if the image size was different than the original.
However, if I recall (this project is almost 15 years old, so I could be remembering wrong) they are stored in 24bit uncompressed bitmap format in the container file, so if you search with a hex editor in the original file for a byte string from the extracted picture, you can find it, and replace it with another bitmap of the same size.
If it isn't stored in 24bit uncompressed format, the extracted images will probably still be the same as the original in the container file and you can still search for them in there with a hex editor. And as long as you replace it with a bitmap of equal or less size, it should work.
When replacing, make sure to replace the entire bitmap file in the container, including the bitmap header.
20
« on: August 30, 2018, 01:56:04 am »
I wanted a simple setup in Symfony where the programmer could define their ide in the parameters file. Sounds simple, right? Just add something like ide_url: 'phpstorm' to parameters.yml->parameters and ide: '%ide_url%' to config.yml->framework. And it worked great, however, my problem was much more convoluted. I am actually running the Symfony server on another machine and am accessing the files via NFS on Windows. So, it would try to open PHPStorm with the incorrect path. Symfony suggests the solution to this is writing your own custom URL handler with %f and %l to fill in the filename and line, and use some weird formatting to do string replaces. So I wrote in 'idea://%%f:%%l&/PROJECT_PATH_ON_SERVER/>DRIVE_LETTER:/PATH_ON_WINDOWS/' (note the double parenthesis for escaping) directly in the config.yml and that worked, kind of. The URL was perfect, but IntelliJ does not seem to register the idea:// protocol handler like PHPStorm theoretically does (according to some online threads) with phpstorm://. So I had to write my own solution. This answer on stackoverflow has the answer on how to register a protocol handler in Windows. But the problem now was that the first parameter passed to IntelliJ started with the idea:// which broke the command-line file-open. So I ended up writing a script to fix this, which is at the bottom. OK, so we’re almost there; I just had to paste the string I came up with back into the parameters.yml, right? I wish. While this was now working properly in a Symfony error page, a new problem arose. The Symfony bin/console debug:config framework command was failing with You have requested a non-existent parameter "f:". The darn thing was reading the unescaped string as 'idea://%f:%l&...' and it thought %f:% was supposed to be a variable. Sigh. So the final part was to double escape the strings with 4 percent signs. 'idea://%%%%f:%%%%l&...'. Except now the URL on the error pages gave me idea://%THE_PATH:%THE_LINE_NUMBER. It was adding an extra parenthesis before both values. This was simple to resolve in the script I wrote, so I was finally able to open scripts directly from the error page. Yay. So here is the final set of data that has to be added to make this work: Registry: HKCR/idea/(default) = URL:idea ProtocolHKCR/idea/URL Protocol = ""HKCR/idea/shell/open/command = "PATH_TO_PHP" -f "PATH_TO_SCRIPT" "%1" "%2" "%3" "%4" "%5" "%6" "%7" "%8" "%9"parameters.yml:parameters:ide_url: 'idea://%%%%f:%%%%l&/ PROJECT_PATH_ON_SERVER/> DRIVE_LETTER:/ PATH_ON_WINDOWS/'config.yml:framework:ide: '%ide_url%'PHP_SCRIPT_FILE:
<?php
function DoOutput($S)
{
   //You might want to do something like output the error to a file or do an alert here
   print $S;
}

if(!isset($argv[1]))
   return DoOutput('File not given');
if(!preg_match('~^idea://(?:%25|%)?([a-z]:[/\\\\][^:]+):%?(\d+)/?$~i', $argv[1], $MatchData))
   return DoOutput('Invalid format: '.$argv[1]);

$FilePath=$MatchData[1];
if(!file_exists($FilePath))
   return DoOutput('Cannot find file: '.$FilePath);

$String='"C:\Program Files\JetBrains\IntelliJ IDEA 2018.1.6\bin\idea64.exe" --line '.$MatchData[2].' '.escapeshellarg($FilePath);
DoOutput($String);
shell_exec($String);
?>
21
« on: August 01, 2018, 10:01:31 pm »
I was surprised in my failure to find a script online to download all of an author’s stories from Fiction Press or Fan Fiction.Net, so I threw together the below. If you go to an author’s page in a browser (only tested in Chrome) it should have all of their stories, and you can run the following script in the console (F12) to grab them all. Their save name format is STORY_NAME_LINK_FORMAT - CHAPTER_NUMBER.html. It works as follows: - Gathers all of the names, chapter 1 links, and chapter counts for each story.
- Converts this information into a list of links it needs to download. The links are formed by using the chapter 1 link, and just replacing the chapter number.
- It then downloads all of the links to your current browser’s download folder.
Do note that chrome should prompt you to answer “This site is attempting to download multiple files”. So of course, say yes. The script is also designed to detect problems, which would happen if fictionpress changes their html formatting.
//Gather the story information
const Stories=[];
$('.mystories .stitle').each((Index, El) =>
   Stories[Index]={Link:$(El).attr('href'), Name:$(El).text()}
);
$('.mystories .xgray').each((Index, El) =>
   Stories[Index].NumChapters=/ - Chapters: (\d+) - /.exec($(El).text())[1]
);

//Get links to all stories
const LinkStart=document.location.protocol+'//'+document.location.host;
const AllLinks=[];
$.each(Stories, (_, Story) => {
   if(typeof(Story.NumChapters)!=='string' || !/^\d+$/.test(Story.NumChapters))
      return console.log('Bad number of chapters for: '+Story.Name);
   const StoryParts=/^\/s\/(\d+)\/1\/(.*)$/.exec(Story.Link);
   if(!StoryParts)
      return console.log('Bad link format for stories: '+Story.Name);
   for(let i=1; i<=Story.NumChapters; i++)
      AllLinks.push([LinkStart+'/s/'+StoryParts[1]+'/'+i+'/'+StoryParts[2], StoryParts[2]+' - '+i+'.html']);
});

//Download all the links
$.each(AllLinks, (_, LinkInfo) =>
   $('a').attr('download', LinkInfo[1]).attr('href', LinkInfo[0])[0].click()
);

jQuery('.blurb.group .heading a[href^="/works"]').map((_, El) => jQuery(El).text()).toArray().join('\n');
22
« on: October 14, 2017, 12:20:52 am »
A function to replace variables in a file that are in the format "VARIABLE_NAME=VARIABLE_DATA". Parameters are: VARIABLE_NAME VARIABLE_DATA FILE_NAME
function ReplaceVar() {
  REPLACE_VAR_NAME="$1";
  REPLACE_VAR_VAL=$(echo "$2" | perl -e '$V=<STDIN>; chomp($V); print quotemeta($V)' -);
  perl -pi -e "s/(?<=$REPLACE_VAR_NAME[ \t]*=).*$/$REPLACE_VAR_VAL/" "$3"
}
The real difference between this script and normal command-line-Perl-regex-replaces is that it makes sure values are properly escaped for the search+replace regular expression.
23
« on: October 10, 2017, 06:35:19 pm »
The following is a simple bash script to ping a different domain once a second and log the output. By default, it pings #.castledragmire.com, where # is an incrementing number starting from 0. The script is written for Cygwin (See the PING_COMMAND variable at the top) but is very easily adaptable to Linux. The log output is: EPOCH_TIMESTAMP DOMAIN PING_OUTPUT
#This uses Window's native ping since the Cygwin ping is sorely lacking in options
#"-n 1"=Only runs once, "-w 3000"=Timeout after 3 seconds
#The grep strings are also directly tailored for Window's native ping
PING_COMMAND=$(
   echo 'C:/Windows/System32/PING.EXE -n 1 -w 3000 $DOMAIN |';
   echo 'grep -iP "^(Request timed out|Reply from|Ping request could not find)"';
)

i=0 #The subdomain counter
STARTTIME=`date +%s.%N` #This holds the timestamp of the end of the previous loop

#Infinite loop
while true
do
   #Get the domain to run. This requires a domain that has a wildcard as a primary subdomain
   DOMAIN="$i.castledragmire.com"

   #Output the time, domain name, and ping output
   echo `date +%s` "$DOMAIN" $(eval $PING_COMMAND)

   #If less than a second has passed, sleep up to 1 second
   ENDTIME=`date +%s.%N`
   SLEEPTIME=$(echo "1 - ($ENDTIME - $STARTTIME)" | bc)
   STARTTIME=$ENDTIME
   if [ $(echo "$SLEEPTIME>0" | bc) -eq 1 ]; then
      sleep $SLEEPTIME
      STARTTIME=$(echo "$STARTTIME + $SLEEPTIME" | bc)
   fi

   #Increment the subdomain counter
   let i+=1
done
24
« on: July 24, 2017, 12:00:18 pm »
I'm very sorry to everyone who has been waiting for me to get some updates done. I've just been super busy lately and getting to spend time on this project has just been impossible. I will be getting to it as soon as I can.
25
« on: July 07, 2017, 04:52:58 pm »
Most likely a database update  I'll take a look at it as soon as I have a chance. (Should be sometime in the next week)
26
« on: June 26, 2017, 02:35:11 am »
Ahah. Should have thought of that. The latest version on github has options for plex user accounts, but I don't think I've put it on my site yet.
27
« on: June 24, 2017, 11:47:49 am »
First, "/var/lib/plexmediaserver/Library/Application Support/Plex Media Server/Plug-in Support/Databases/com.plexapp.plugins.library.db" needs to be quoted, since it has spaces, or your command line interpreter will think those are separate parameters.
I'm surprised it decided to import at all with what you gave it, since you gave an unquoted (and therefore bogus) path to the database. I'm guessing it found the path on its own so it didn't error out.
Second, you only gave the "Playlist_Path" parameter and not a "Plex_Playlist_Name" parameter.
28
« on: June 19, 2017, 04:09:42 pm »
"DB Error: no such module: fts4" indicates an outdated or incomplete sqlite3 version. Google also points out that this happens when trying to compile for iOS, or possibly osx.
29
« on: May 30, 2017, 08:18:38 pm »
To log all process spawns from a user:
(Fill in USERNAME)
auditctl -a exit,always -S execve -F uid=USERNAME
To grep for only these entries, and exclude processes:
(Fill in USERID)
(EXCLUDE_REGEX=A regular expression of process names to exclude. Ex: cron|dovecot)
ausearch -m ALL | perl -0777 -e 'print grep(/uid=USERID/, grep(!/REGEX/im, split(/^----$/m, <>)))'Using user searches (-ua -ue -ui -ul) for ausearch may work too, but I've found it unreliable.
30
« on: March 01, 2017, 09:08:12 pm »
It took me days to get a Windows 7 install back up when I lost a drive with the MBR record that booted to my GPT drive. The windows booting and install processes are just REALLY finicky and temperamental. One of my largest problems was that I couldn’t find certain required files online, so the only way to acquire them was to unhook all but 1 GPT partitioned drive from the computer and install Windows to it. Here are the files needed to boot Windows 7 x64 from a GPT drive, assuming your mother board supports EFI. The first step is creating a system partition anywhere on the drive (you may have to shrink another partition) and extract these files to that partition. This blog post has good instructions on the entire process, however, instead of using bcdboot, I recommend using “bootrec /ScanOS” followed by “bootrec /RebuildBCD”. You MAY also need a “bootrec /FixMBR”. These files were obtained from a Windows 7 x64 Ultimate install, so it should work if your install type matches. I expect it will work for any Windows version of an x64 install. Here is a list of the files:
EFI
├── Boot
│   └── bootx64.efi
└── Microsoft
    └── Boot
        ├── bootmgfw.efi
        ├── bootmgr.efi
        ├── BOOTSTAT.DAT
        ├── cs-CZ
        │   ├── bootmgfw.efi.mui
        │   └── bootmgr.efi.mui
        ├── da-DK
        │   ├── bootmgfw.efi.mui
        │   └── bootmgr.efi.mui
        ├── de-DE
        │   ├── bootmgfw.efi.mui
        │   └── bootmgr.efi.mui
        ├── el-GR
        │   ├── bootmgfw.efi.mui
        │   └── bootmgr.efi.mui
        ├── en-US
        │   ├── bootmgfw.efi.mui
        │   ├── bootmgr.efi.mui
        │   └── memtest.efi.mui
        ├── es-ES
        │   ├── bootmgfw.efi.mui
        │   └── bootmgr.efi.mui
        ├── fi-FI
        │   ├── bootmgfw.efi.mui
        │   └── bootmgr.efi.mui
        ├── Fonts
        │   ├── chs_boot.ttf
        │   ├── cht_boot.ttf
        │   ├── jpn_boot.ttf
        │   ├── kor_boot.ttf
        │   └── wgl4_boot.ttf
        ├── fr-FR
        │   ├── bootmgfw.efi.mui
        │   └── bootmgr.efi.mui
        ├── hu-HU
        │   ├── bootmgfw.efi.mui
        │   └── bootmgr.efi.mui
        ├── it-IT
        │   ├── bootmgfw.efi.mui
        │   └── bootmgr.efi.mui
        ├── ja-JP
        │   ├── bootmgfw.efi.mui
        │   └── bootmgr.efi.mui
        ├── ko-KR
        │   ├── bootmgfw.efi.mui
        │   └── bootmgr.efi.mui
        ├── memtest.efi
        ├── nb-NO
        │   ├── bootmgfw.efi.mui
        │   └── bootmgr.efi.mui
        ├── nl-NL
        │   ├── bootmgfw.efi.mui
        │   └── bootmgr.efi.mui
        ├── pl-PL
        │   ├── bootmgfw.efi.mui
        │   └── bootmgr.efi.mui
        ├── pt-BR
        │   ├── bootmgfw.efi.mui
        │   └── bootmgr.efi.mui
        ├── pt-PT
        │   ├── bootmgfw.efi.mui
        │   └── bootmgr.efi.mui
        ├── ru-RU
        │   ├── bootmgfw.efi.mui
        │   └── bootmgr.efi.mui
        ├── sv-SE
        │   ├── bootmgfw.efi.mui
        │   └── bootmgr.efi.mui
        ├── tr-TR
        │   ├── bootmgfw.efi.mui
        │   └── bootmgr.efi.mui
        ├── zh-CN
        │   ├── bootmgfw.efi.mui
        │   └── bootmgr.efi.mui
        ├── zh-HK
        │   ├── bootmgfw.efi.mui
        │   └── bootmgr.efi.mui
        └── zh-TW
            ├── bootmgfw.efi.mui
            └── bootmgr.efi.mui

27 directories, 57 files
“EFI\Microsoft\Boot\BCD” is not included because it is computer dependent and is created with the bootrec command. “EFI\Microsoft\Boot\BCD.LOG*” are not included for obvious reasons.
|
|